Headliner plasterboard itself
Plasterboard для отделки потолка сегодня становится очень популярным. Сопутствующие траты не сильно ударят по бюджету семьи. К тому же все работы можно вполне выполнить самостоятельно, даже не имея особых навыков. В этой статье будет поэтапно описана такая процедура, как обшивка потолка гипсокартоном своими руками.
Why drywall

Drywall is a modern finishing material. It is used in the design of walls and ceilings. He owes his popularity to the following:
- Drywall easy to install. The material is easy to cut, attach, it is light and quite durable.
- The cost of drywall is small.
- With it, you can easily make designs of any complexity.
- As a result of the application of drywall, an absolutely smooth surface is obtained, which facilitates the subsequent finishing.
But there are some drawbacks. First, the installation requires the creation of a frame (especially if the draft ceiling has large irregularities), which can take up space. Secondly, it is forbidden to hang heavy objects (glass or crystal chandelier) on the gypsum-covered ceiling. He simply will not stand such a load. For fixing heavy chandeliers it is necessary to mount an additional base.
Preparatory stage

First, prepare the ceiling yourself. Drywall will close all irregularities and defects, so you should not make any special efforts to prepare a draft ceiling. It is necessary to remove all fragile areas, to lay electrical wiring to the places where lighting devices will be installed, and to treat the surface with an antiseptic (especially in those rooms where high humidity is observed).
After such preparation proceed to markup. This work is worth doing very carefully, it will depend on the ease of installation and evenness of the resulting structure. For the markup, you will need one of the following tools:
- hydro level;
- building level;
- laser level.
They all perform similar tasks, so how to use is your choice.

As a start, select any angle, as a rule, start marking from the far. Measure the required distance from the ceiling. It should be enough to accommodate all communications and profile design. Usually five centimeters are enough.
Then you need to draw a line along this perimeter around the room. For this it is convenient to use a laser level. It is enough to put it in the first point and hold the beam on all sides of the room and apply the marking.
Also worth noting is the frame attachment point. Profiles must be placed across the room. The pitch between them should be no more than 60 cm, and the distance between fastening points should not exceed 75 cm.
Profile mounting
For the frame are taken metal profiles. The first thing they fix on the perimeter. For this, the profiles are applied to the delineated line on the wall and fastened with dowels, in compliance with the one-meter step.

The next step will be the installation of guide profiles. They are mounted on the previously marked places on the ceiling with the help of dowel-nails. Then to the mounts, with the help of special screws (they are also called "bugs" or "fleas"), fix the guide profiles.
The final stage will be mounting jumpers. They are cut from the SD profile and mounted to the guide profiles in steps of 60 centimeters with the help of connecting "crabs." At this installation of the frame for a single-level ceiling is completed.

If it is decided to design the ceiling with multi-level structures, then this process is complicated by the installation of additional profiles. How, for example, to make a two-level ceiling of drywall, see here.

More information about this work can be found by viewing the video.
Drywall installation
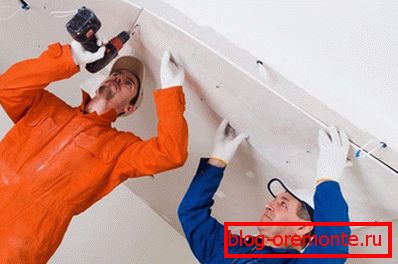
After mounting the frame, you can proceed to fixing sheets of drywall. First, the marking and cutting of sheets of the required area is done. Then drywall is applied to the right place and fixed with screws.
The sheet weighs a little, but if you carry out installation alone, then for its fixing it is necessary to use special devices. The simplest such device can be considered a construction in the form of a mop. It, resting against the floor or another surface, will fix one edge of the sheet while you fasten the opposite one.

There are other devices with a more complex device. All of them will help to mount sheets of drywall. But in order not to spend extra money on their acquisition (or rent) it is better to call an assistant.
The sheets are fixed so that the joints in the rows do not coincide. It is also necessary to leave gaps between sheets of drywall to 5 mm. The same distance is left between the drywall and the walls.

Now it is necessary to prime and putty the seams and caps of the self-tapping screws.


Then the whole surface is coated with a primer. After everything is dry, you can proceed to further finishing work.
Video
And in this video, it will be shown how to install a three-level plasterboard ceiling with a pocket for installing lighting. The wizard indicates the features of the installation, which will be very useful to know a beginner:
A photo


