Ceiling fan connection
Ceiling fan in recent years has become a much more attractive appearance. Its function is very simple, and it copes well in order to cool the air in a particular room. Moreover, it plays a key role in creating a complex ventilation system. But its main purpose should not be confused: it cools not the premises, but people. And ceiling models do a good job. In this article we will look at how to connect a ceiling fan, its advantages and device, as well as present the wiring diagrams.
Benefits

There are many room cooling systems. Consider some of the positive qualities of the ceiling fans:
- Unlike air conditioning systems, ceiling fans consume 40% less electricity.
- You can have several fans in the house and even in the same room.
- Easy to install.
- Unlike an air conditioner, it has a significantly lower price, and the cooling quality does not deteriorate.
- There are models combined with a chandelier. Especially often they are installed in the kitchen.

To make it easier to deal with the installation of a ceiling fan, let's look at some of the fan components.
Device

For many years, the scheme of the ceiling fan remains unchanged. Therefore, in each case it will be easy for you to deal with their different models and types. Components of the ceiling fan:
- Electric motor Due to high-quality bearings, the fan can spin around the clock, while consuming a small amount of electricity.
- Housing The housing for the electric motor can be made of plastic or metal. More expensive models have a sealed case that prevents dust from entering the engine. Accordingly, the life increases.
- Blades. Their number ranges from 3 to 6. Some designer ceiling fans have up to 15 blades. But in this case, the ceiling fan becomes more decorative object. The blades can be made of wood, metal, plastic and other materials.
- Lanka (or iron). It connects the blades with the engine. In all cases, it is made from metal.
- Ceiling mount. The fixing will depend on the material of the ceiling (concrete, wood, etc.)
- Barbell Bars can be of different lengths up to 1.5 meters. Used for hanging the subject.
- Caps Caps close the mounting on the bar below and above. The cap hides the different electrical fittings.
- Decorative overlays. Close the fastening screws on the fan.
- Regulators, remote controls and switches. Depending on the configuration and model of the ceiling fan, the presence of the remote control and other controls may differ.
Note! The optimal installation height of the fan from the floor is 2.3 meters!
Installation
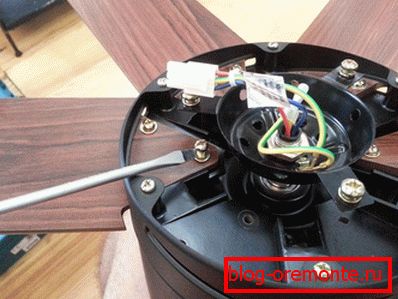
All work on the installation of a ceiling fan has no complicated processes. At the beginning of work it is necessary to turn off the electricity. This will prevent the possibility of an accident. After mounted on the ceiling supporting strut. The weight of the fan may be different, so the spacer must be attached to the base of the ceiling, in the case, for example, if the ceiling is made of drywall. The hole in the drywall is made according to the size of the junction box, which will be installed later.
At the next stage, it is time to fasten the bracket with several screws. Determine the wiring that goes out of the box. As a rule, the fan has thin copper wires. They should be connected according to the scheme of zero and phase. Each connection can be fastened with a decorative cap. All wires should be carefully placed in a junction box and closed with a lid. Now the fan blades and the lamp are mounted, if it is included in the design. For this is also used bracket. Using decorative caps, close all electrical connections on the bar below and above.

Note! The fan can be turned on with the key along with the light in the room. Adjustment of its operation can also be carried out using a remote control. It all depends on your chosen model.
So, as you can see, connecting a ceiling fan with your own hands does not present any particular difficulties. In most cases, detailed instructions from the manufacturer are attached to the device. Therefore, you should not have much difficulty with this work. Leave your comments if you already have sufficient experience in the installation of a ceiling fan.