Cassette ceiling installation
When it comes time to carry out repairs in the apartment, there are many problems and questions. The modern construction market is a huge selection of technologies and materials, to navigate in which is sometimes quite difficult. For example, a variety of technologies can be used in the repair of the ceiling, and one of them is the installation of a cassette ceiling. This type of work stands out for its simplicity, and all the necessary work can be done by hand.
general description

By and large, the cassette ceiling is a type of suspended ceilings, i.e. it is mounted on pre-installed guides, which in turn are attached to the base with suspensions.
Such a ceiling consists of the following structural elements:
Suspensions. They are of two types, that is, simple and spring type. If the level of the future ceiling is located at a distance not exceeding 10 cm, then use simple suspensions. If the ceiling level is lower, spring hangers should be used, which can be adjusted.
Guides. We are talking about special profile slats, which serve to directly install the ceiling cassettes. They are most often made of thin galvanized metal or aluminum. Guides may be called T-slats.
L-strips. These structural elements are also made of metal and are used to fasten the guides to the walls.
Ceiling cassettes. These are the decorative panels that make up the ceiling. They can be made of both aluminum and PVC.
It can be added that another type of constructions, which use smaller cassettes, can be attributed to cassette ceilings, but this will be discussed below.
Stages of work

Cassette-type ceilings are mounted in several separate successive stages. Work requires compliance with caution and accuracy. The first stage of the work can be considered the marking of the walls and ceiling.
First you need to note the overall level of the ceiling. For these purposes, marks are made on one of the walls (for example, the longest) on both sides, closer to the corners. This should take into account the irregularities and projections of the base. If it is even, then the indentation can be made smaller, but with the expectation that the elements of electrical wiring could easily fit behind the ceiling. After the marks are made, they must be connected to each other with a padding cord. It is important to control the horizontal line, for which it is convenient to use the building level. All other walls of the room are laid out in a similar way, as a result, the lines will be connected, and the future level of the ceiling can be seen.
When the marking of the walls is finished, you need to mark the ceiling. For this you can use all the same upholstery cord. It is necessary at a distance of 60 cm from the wall (the most common cassettes of suspended ceilings have dimensions of 60? 60 cm) to make two marks. After which they are joined, having beaten off the line. In general, the principle is the same as when marking the walls. Thus, it is necessary to draw the entire surface of the ceiling so that the result is a lattice of 60? 60 cm.
Drilling holes
Then you can proceed to the drilling of holes for mounting. They should be made on the marked line at a distance of 40 cm from each other, then the work is transferred to the ceiling. At the intersection of the marking lines are also drilled holes. Dowels are driven into the holes.
Mounting

When everything is ready, it is necessary to fasten an L-bar to the walls. This is done with screws. The work is simple, but rather laborious. The bar should be set around the perimeter. If it becomes necessary to cut off this structural element, it is convenient to do this with the help of metal shears. After that, you can proceed to the installation of suspensions to the ceiling. This is done with screws and dowels.
It can be added that installation of fastenings on the bases from concrete is considered above. If the walls and ceiling are wooden, then there is no need to drill holes, and the structural elements can be fastened immediately.
Installation of guides

The next stage of work is the installation of guide elements. As them the T-lath is used. These elements are mounted along the lines marked on the ceiling with suspensions. The horizontal installation of each rail must be controlled using a level.
The result of the work should be a flat horizontal crate, on which the cassettes will be installed.
Installing cassettes
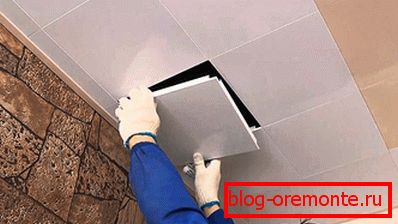
The final stage of the work is the installation of the ceiling cassettes themselves. The elements are simply inserted into the cells of the batten and placed on the guides. In order to put the extreme cassette from the walls, as a rule, they need to be cut. If the panels are made of PVC, then they can simply be cut with a stationery knife. If for their manufacture was used aluminum sheet, then such elements are cut with scissors for metal.
At this manufacturing cassette ceiling can be considered complete. We can only add that during installation you should not forget about the installation of lighting elements, for which you need to make holes in pre-defined cassettes using, for example, a drill with a crown attached.
French ceilings

It should also be added that suspended cassette ceilings can be made using a slightly different technology. Such ceilings are also called French.
The main differences are that the cassettes of such ceilings are made of metal, for example, aluminum, their installation is carried out on special profile guides, which work on the principle of clamping.
Guides, as in the previous case, are mounted on hangers and L-strips, but the design provides only longitudinal elements. They are set at a distance of 30 cm from each other (tape sizes 30? 30 cm).
The cassettes themselves are also installed somewhat differently: they do not fit on top of the guides, as in the previous case, but are inserted into the clamps of the guides from below.
As can be seen from the above, the installation of cassette-type suspended ceilings is a quite feasible task. For the most complete understanding of the nature of the work and features of their conduct, you can familiarize yourself with the video on the topic.
Video
This video clearly shows the installation of the frame and installation of the cassette ceiling: