Concrete steps: the length and width of the spans of the
In order to make concrete steps with your own hands, desire alone along with the availability of building materials will not be enough - here you will also need some knowledge of the rules by which stairs are designed. After all, the steepness, width and length of the flight of stairs depends not only on the ease of movement, but sometimes on human health - inconvenient steps may be the cause of injury. To avoid this, you can familiarize yourself with the general rules of safety, formwork installation techniques and methods for pouring concrete, as well as watch the thematic video in this article as an add-on.
Stair building
The length and width of the span. Steps
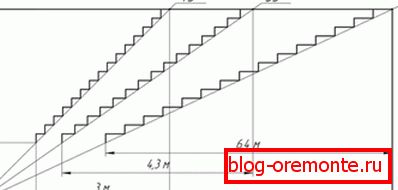
- If you want to pour a concrete staircase in your house for permanent use with your own hands, then you should, according to GOST 23120-78, observe a certain slope of the march, which can be from 25? up to 45? - this is the spectrum of the most optimal slope. But, as you understand, the angle depends on the length of the departure, therefore, if you have such an opportunity, it is better to make the ascent more gentle. After all, when you tilt 40? -45? It is extremely difficult for children, the sick and the elderly to move around and such a staircase in the house can be an insurmountable obstacle for someone, especially if it is too long.
- The most convenient for the descent is the slope of the march from 33? up to 35 ?, that is, here the person does not have any particular difficulties, in any case, they become the least. Of course, sometimes optimization can stumble through the lack of free space, but in such cases construct structures with turns of 90? and 180 ?.
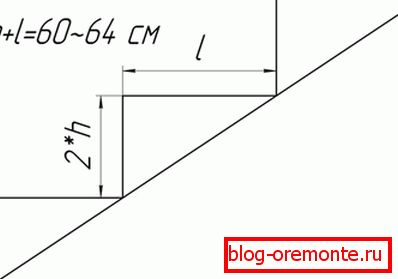
- Есть такой термин, как «удобная лестница» - это означает, что поднимаясь или спускаясь человек будет делать такой же шаг, как и при обычной ходьбе, а средняя его длина составляет от 60 см до 64 см (160-180 см - средний рост). So, you need to ensure that the height of the riser (h), multiplied by 2 in total with L treads, should be as close as possible to this figure - 2h + L? 60-64 cm. It should be borne in mind that approximately 70% of the foot of an adult individual, which means that its width will be about 25-30 cm, by the way, composing steps are calculated according to the same principle.
Note. When calculating the slope, you should take into account that the steeper the march, the higher the risers will be, which will decrease L treads, but try not to let this value be less than 20 cm
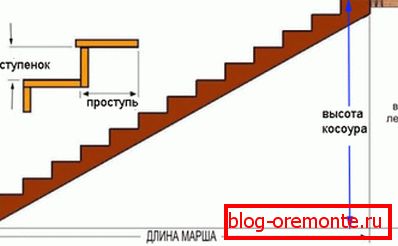
- To determine the size of the kosour, we need the principle of a right triangle, where A denotes the height from the lower floor to the upper point of the kosura; B is the length of the march; C - the quantity we are looking for - such calculations will allow to make the formwork correctly. For such calculations, we will use a formula familiar from school A2+B2=C2.
- Imagine that we need to lay concrete steps between two floors, where the distance from the lower floor to the upper one is 285 cm, and if the ceiling is 30 cm thick, the distance from the lower floor to the ceiling will be 255 cm. If we take the height of the riser 19 cm, then we will have 2.85 / 0.19 = 15 treads, as in the upper figure, which can withstand 26 cm - 2h + L = 2 * 19 + 26 = 64 cm.
- Now, to build the formwork, we recall the principle of a right-angled triangle and make calculations using it: A2+B2=C2, here A = 0.26 * 14 = 3.64 m, and B = 2.85 m, which means 3.642*2,852=13,2496+8,1225=21,3721. But we know that 21.3721 = C2 and extract from this value the square root: v21.3721 = 4,623m - this is how we get the net length of the kosour, but for blanks on the formwork it is better to take a timber somewhere 4.8-5m - it is better to cut off the excess later.

- And another important point is the width of the flight of stairs, and the figure above shows the standard acceptable parameters.. So, the minimum width is allowed from 70 cm to 80 cm - this is most often applicable to non-frequently visited objects. Average or comfortable width from 90 cm to 120 cm, but the fact that more than this is already considered a spacious span and is possible only in the private sector and elite buildings (the wider the cell, the higher the price of the building).
| Number of steps | 11 | 12 | 13 | 14 | 15 | 16 | 17 | 18 | 19 | 20 | 21 | 22 | 23 |
| Floor height in cm | |||||||||||||
| 210 | 199,9 | 175 | 161,5 | 150 | 140 | 131,3 | 123,6 | - | - | - | - | - | - |
| 240 | - | 200 | 134,5 | 172,4 | 160 | 150 | 141,2 | 133,5 | 126,3 | 120 | - | - | - |
| 270 | - | - | 192,9 | 180 | 168,8 | 158,8 | 150 | 142,1 | 135 | 128,5 | 122,7 | - | |
| 300 | - | - | - | - | 200 | 187,5 | 176,5 | 168,7 | 157,9 | 150 | 142,5 | 136,4 | 130,4 |
| 330 | - | - | - | - | - | - | 194,1 | 183,3 | 173,7 | 155 | 157,1 | 150 | 143,5 |
Note. For preliminary (approximate) calculations you can use this table, where the height of the steps is specified in mm. Often the snag in determining the number of steps is that the number is not divisible without remainder. By the same calculations you can make installation of wooden steps on the concrete basis.
Installation of formwork
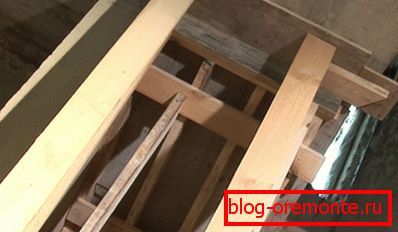
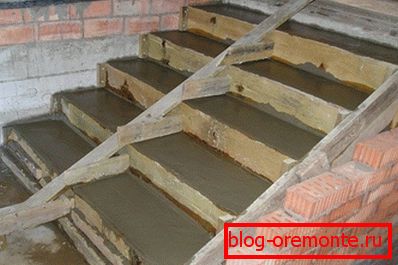
Прежде чем начать строительство опалубки, сразу хочется обратить внимание на подпорную систему (см. фото вверху), которая будет её удерживать вместе с мокрым бетоном, да ещё и вибрационными нагрузками во время заливки. Вся эта конструкция будет находиться в подвесном состоянии и её просадка в одном месте всего на 1-2 мм может вызвать образование трещин в бетоне, что практически сведёт на нет все ваши труды. Поэтому, в качестве стояков для подпорных элементов следует использовать брёвна, деревянный брус, не заботясь об ограничении их количества, а наоборот, устанавливая крепеж как можно чаще (см.также статью «Железобетонные ступени: нормативные документы и особенности монтажа»).
For the formwork pallet it is most convenient to use either laminated plywood or oriented strand board (OSB) - the thickness of one and the other sheet should be not less than 10-12 mm to impart rigidity.
Since you will have to dock this material, a seam will remain in this place on the concrete, but this can be avoided - the joints of the panels are sealed with acrylic putty or tile glue. Alternatively, the pallet can be assembled from cut or grooved boards and cover it with dense cellophane or fiberglass.
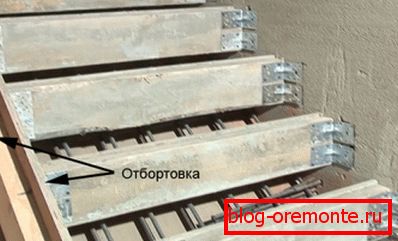
Для отбортовки используйте брус 150×50 мм или 200×50 мм, но чтобы поверхность литья получилась более гладкой, а следовательно, более привлекательной, то с внутренней стороны обшиваете её той же фанерой или ОСП, который использовали для поддона. Если заливка будет происходить у стены, то вам, естественно, понадобится только один борт, но если такая лестница будет находится посредине помещения, то отбортовывать конструкцию придётся с двух сторон.

Главным несущим элементом лестницы будет арматурный каркас, для которого следует использовать рифлёный прут сечением не менее 12 мм, а ещё лучше - 14 мм. Из него вяжется две обрешётки с ячейками 200×200 мм или 200×150 мм, только постарайтесь, чтобы все продольные и поперечные прутья были цельными - это придаст дополнительную прочность будущей лестнице.
Two battens are connected to each other in a frame with the help of vertical risers made of reinforcement with a frequency of 600 mm through three cells (this is best done directly on the pallet).
Каркас должен получится как бы в подвешенном состоянии, поэтому. Вертикальную арматуру для связки нарезайте на 50 мм длиннее, чтобы металлическая конструкция оказалась на своеобразных «ножках» - тогда она полностью будет залита бетоном и принесёт наибольшую пользу.
If there is a wall on one side of the structure, then use this and, having drilled holes there in size, hammer the transverse reinforcement there. Knit produce soft knitting wire - it is much more efficient than electric or gas welding.
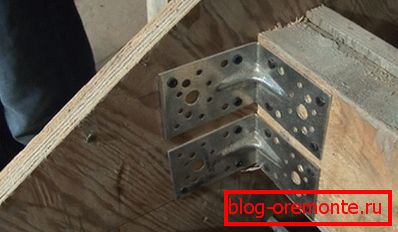
Обратите внимание на снимок вверху, там видно, как сделать бетонные ступеньки, точнее, там показан фрагмент отбортовки опалубки для их заливки, для которой используется тот же брус 200×200 мм или 200×150 мм, а с внутренней стороны ламинированная фанера или ОСП. Вся опалубка должна получиться жёсткой, поэтому для крепления поперечной отбортовки к продольной используются металлические уголки, которые прикручиваются саморезами, что тоже хорошо видно на фотографии. В данном случае очень важно соблюдать высоту и горизонтальный уровень ОСП или фанеры, потому что её верхняя грань будет ориентиром для заливки бетона на ступеньку лестницы.
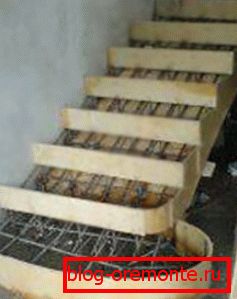
Without a doubt, on the stairs that you are setting up, there will be a railing, therefore, you need balusters for them and before you pour concrete, you are best to weld the mortgages to the frame, which will serve as the basis. This can be done both at each step, and after one step - if this is not done, then you will have to drill diamond holes in the concrete, which will be more difficult.
Recommendation. You need to assemble the entire structure to the end, install all the supports that we mentioned at the beginning of the subtitle and check the formwork for strength. If you notice that there is a backlash in any node or in the entire assembly as a whole, then the work cannot be started - this deficiency must be eliminated.
Concrete works
| For cement M400 | For cement M500 | |||||||
| Brand / grade of concrete strength | Ingredients in kg: C / P / Sch | Volume in l per 10 liters of cement | Concrete in l per 10l cement | Brand of concrete | Ingredients in kg: C / P / Sch | Volume in l per 10 liters of cement | Concrete in l per 10l cement | |
| 100 / B7.5 | 1/4,6/7 | 41/61 | 78 | 100 / B7.5 | 1/5,8/8,1 | 53/71 | 90 | |
| 150 / B10 | 1/3,5/5,7 | 32/50 | 64 | 150 / B10 | 1/4,5/6,6 | 40/58 | 73 | |
| 200 / B15 | /2,6/4,8 | 25/42 | 54 | 200 / B15 | 1/3,5/5,6 | 32/49 | 62 | |
| 250 / B20 | 1/2,1/3,9 | 19/34 | 43 | 250 / B20 | 1/2,6/4,5 | 24/39 | 50 | |
| 300 / B22.5 | 1/1,9/3,7 | 17/32 | 41 | 300 / B22.5 | 1/2,4/4,3 | 22/37 | 47 | |
| 400 / В30 | 1/1,2/2,7 | 11/24 | 31 | 400 / В30 | 1/1,6/3,2 | 14/28 | 36 | |
| 500 / В40 | 1/1,1/2,5 | 10/22 | 29 | 500 / В40 | 1/1,4/2,9 | 12/25 | 32 | |
Table of proportions of the ingredients of concrete
Now you need to prepare a solution for pouring, the proportions of the ingredients of which you see in the upper table, but remember that repairing concrete steps is almost impossible (only cosmetics), which means you need concrete not lower than M300 class B22.5 (above you can).
It can be prepared independently in a concrete mixer or even manually, kneading in any container, although, if there is a ZHBI node nearby, then you can order a ready-made solution. It is easy to calculate its quantity - calculate the volume of each step (height * by length * by width) and multiply by their number plus the platform, if one is included in the project.
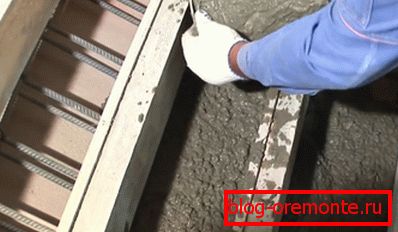
The consistency of the mortar should be similar to that of the cement-sand screed, that is, the mixture will be rare enough so that it can fill the entire space around the reinforcement cage. You start pouring from the bottom - if there is a platform there, you first make a platform, and then pour steps, just try not to leave air bubbles and first you can use a cutting from a spade or some stick, ramming it.
Take this very seriously - we have already said that the overhaul of concrete steps is impossible, therefore, emptiness in the structure means a critical (unremovable) defect.

Regardless of the fact that you tamp the solution with a stick, it will be very good if you also use a vibrator for this - so you will get rid of even small air bubbles, and smooth down the steps with a trowel and rub with a trowel.
Do not forget to leave mortgages in sight - if you miss this, then you will most likely have to drill or cut steps to get to the frame, but cutting the reinforced concrete with diamond circles leads to the destruction of the monolith, which is undesirable.
Conclusion
The formwork can be dismantled after a week, but start operating the structure no earlier than after 28 days! If by chance during the dismantling of the formwork some kind of chips were formed, then the restoration of the concrete steps here is done with Ceresit CM11 tile adhesive (also learn how to make steps for the porch with concrete in the country by your own hands).