Concrete floor on the ground: features of laying, pouring,
When self-erecting a country house on a strip foundation in areas with low groundwater level, it makes sense to carry out the concrete floor on the ground with your own hands, since this technology is the fastest, most economical and allows you to do without the use of special equipment.
In addition, this floor design has a higher reliability and durability than the floors on the ground without concrete, and during operation does not require additional maintenance.

Features of laying the floor on the ground
In order to study this issue in detail, this article will consider the construction of a concrete floor over the ground in residential buildings with a strip foundation.
In addition, the reader will be offered detailed instructions, which presents the technology of the concrete floor on the ground with a step-by-step description of the implementation of all technological stages of construction.

Preparatory work
It is recommended to start work on the arrangement of the floor after the walls of the building have been erected, window and door openings are closed and the roof is installed, and the average daily ambient temperature will not fall below + 5 ° C.
Before you pour the concrete floor on the ground it is necessary to make a sand and gravel pad.
- To clear a plot of land inside a building from debris, and remove the top layer of soil to a depth of 200-300 mm, after which the surface of the ground must be tamped down using a manual tamper or vibrating plate.
- On the inner perimeter of the walls of the building to perform the marking, outlining the zero mark of the subfloor. With the help of a hydraulic level, check that in all rooms the zero mark is at the same height.
- On compacted soil, sand and gravel dumping, which consists of a layer of gravel 50 mm thick and a layer of sand 100-150 mm thick.
- Moisten the surface of the pillow with plenty of water, compact it, then pour a thin layer of rubble with a particle fraction of 40-60 mm
- Sprinkle the rubble lightly with sand, then moisten with water and ram again.

Tip! When filling sand and gravel cushion, it is necessary to control it with a building level so that all layers of backfill are strictly parallel to the horizon.
Monolithic slab casting
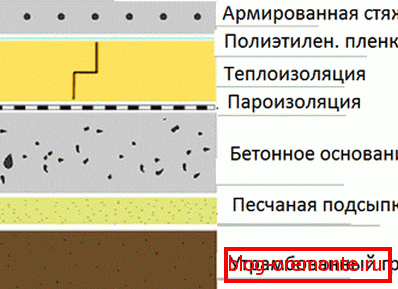
The next stage of construction is the manufacture of a monolithic reinforced concrete slab, which will perform supporting functions and take on all the main load on the floor. For this reason, it must be reinforced with steel mesh, and its thickness must be at least 80-100 mm.
Next will be given a description of how to make a monolithic reinforced concrete slab.
- Lay waterproofing of thick polyethylene film on a sand and gravel cushion so that it penetrates walls to a height of at least 500 mm.
- Lay the metal reinforcing mesh on the floor on low spacers so that at the joints it has an overlap of at least 100 mm.
- Prepare a concrete solution and evenly distribute it over the entire area of the room with a layer at least 80 mm thick.
- With the help of the level, by measuring the distance to the marks of the finished floor, check that the surface to be filled in is strictly horizontal.
After the mortar has set, the surface must be left for at least one week until the concrete has completely cured.

Tip! All engineering communications are recommended to be laid before the slab is poured, but if this was not done in advance, the cutting of reinforced concrete with diamond circles after the solidification of the monolith can be used in the future.
Warming and waterproofing
Concrete floor in contact with the ground, is a source of moisture and cold penetration, therefore, to ensure a comfortable microclimate in the house requires careful heat and waterproofing the concrete floor on the ground.
- As a waterproofing, you can use a thick plastic film, but it is best to cover the surface of the monolithic slab with a layer of liquid hot bitumen.
- Thermal insulation can be done in two ways. In the first case, a layer of blast furnace slag or expanded clay with a thickness of 100–200 mm is poured over the entire surface of the slab; however, this material is hygroscopic and can absorb moisture.
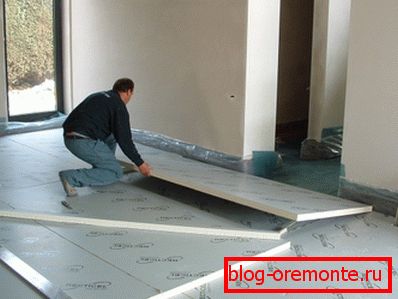
- The second option is considered more acceptable and consists of laying extruded polystyrene foam (EPS) on a floor with a thickness of 50-100 mm.
- Expanded clay should be distributed in a uniform layer, and the EPSS plates should be laid tightly, without gaps, on the floor and secured with dowels with wide plastic washers.
- It is recommended to lay another waterproofing layer of thick polyethylene film not less than 200 microns thick on top of the insulation, on top of which a reinforcing mesh is placed.

Tip! Making concrete floor in the garage on the ground, you can do without heat insulation, but high-quality waterproofing must be done in any case.
Mounting finishing screed
The finishing screed serves to evenly distribute the load and lay the finishing floor covering (ceramic tile, linoleum, laminate), so it must have the same thickness and a smooth, uniform surface.
The quality of this stage of work should be given special attention, because the cost of rework, in case of violation of technology may be too high.
- Using a cement or plaster mortar over the entire area of the room at a distance of at least 1 meter from each other, install guide rails beacons that define the upper level of the sub-floor.
- Starting from the far corner of the room, fill in each area of the floor, evenly distributing the cement-sand mortar over the entire surface of the poured area.
- To do this, use a metallic or wooden rule, moving it with vibrating movements along the guide beacons.
- Thus, moving from one section to another, it is necessary to fill the entire room, which is recommended to be completed in one working day.
- After the concrete solution has set, it is necessary to remove the beacon guides, and to wipe up the gaps with a fresh cement-sand mortar.
Upon completion of this operation, the room must be left for several days until the final setting and drying of the cement mortar. After 2-3 weeks, the floor surface must be primed. For this purpose, it is best to use epoxy or polyurethane primer for concrete, which must be applied with a construction roller.

Note! Penetrating the ground for the concrete floor, tying particles of sand and cement, increases its strength, and also serves as an additional waterproofing.
Making solution
Table 1 shows the proportions of building materials for the manufacture of cement-sand and concrete solutions.
Table 1.
| № | Component Name | Number of components | Concrete density kg / m3 | Concrete grade kg / cm2 |
| 1 | Cement, kg Sand quartz m3 (kg) Water, l. | 240 1,15 (1950) 90…130 | 2200 | 130 |
| 2 | Cement, kg Sand quartz. m3 (kg) Dolomitic or limestone crushed stone, m3 (kg) Water, l | 200 0,54 (920) 0,65 (980) 90…130 | 2100 | 150 |
- Claim 1 contains the recipe for the manufacture of cement-sand mortar for finishing screed.
- Clause 2 contains the recipe for the production of concrete solution for pouring monolithic slabs.

Conclusion
After reading this article, it becomes clear that the independent production of a concrete floor in a country house is quite capable of almost any home craftsman (find out here how the cracks are embedded in concrete).
For more information on this issue, you can watch the video in this article or read similar materials on our site.